
Experts in LED strip lighting
- Strip to Power Solderless connector-CB-C1")
LED Quick Connector ColorBright™ Series (8mm)- Strip to Power Solderless connector-CB-C1
Product Description
LED Strip Light Connectors - Solderless Connector
Solderless connector strip for Colorbright Single Color Series (8mm) make is easy for you to connect your LED high intensity flexible strip light to any wire or power supply. These connectors are compatible with Colorbright single color strip lights and other single color strip lights 5/16 inch (8mm) wide.
Easily connect your flexible strip lights without any hard work. We make it simple to install and enjoy your ColorBright flexible strip lights in no time.
Attention:
We recommend to solder your LED strip lights for a stronger connection.
These connectors can be fragile if not handled with care.
Please follow the instructions while installing.
Specifications
- The wire length is 152 mm
- Amperage maximum: 5 amps
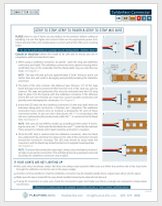
Quick Installation Guide (please read!)
Although soldering is the best way to maintain a long lasting connection, the solderless connectors are a great way to get your project going quickly. When installed correctly, the connectors should not be loose and should provide a secure connection.
|
| Solderless Connector Connection Guide |
Advantages
- NO difficult soldering
- Add an extra strip easily!
- Make it a VERY easy connect and disconnect
- Hold strips in place with durable securing brackets
Short tutorial: (photo tutorial below)
- Cut along the mark line, tear a little bit 3M backing tape from the mark. If 3M tape is not peeled off a little, it will not be easy to insert the strip into the connector.
- Pull the black plastic lock out from the LED solderless connector.
- Insert strip into the LED solderless connector. There are two sides to the connecting tray. Make sure the wider of the white sides faces up. This is the top.
- Make sure the soldering pads fully touch the conjunction metal.
- Do not use to much strength while pulling the plastic lock, otherwise it can destroy the LED solderless connector.
- Push the plastic lock back towards the middle in the lock position. Be gentle and make sure the mounting tray is securely closed or the lights will not light up.
If your lights do not light up
- Color does not always matter! Make sure you are follow the positive side of the flex strip down through the solderless connector wire to the power supply. Red/black can either mean (+) or (-) depending on what side of the LED flex strip you have hooked the connector up to.
- Another common problem is that the LED solderless connector may be installed upside down, repeat steps above and try again.
- Also, MAKE SURE the tray is closed all the way. Be gentle!
- Check your power supply and make sure it is hooked up correctly and correct + and - too.